User Story Mapping – telling story
Thien Ca Nguyen
- posted on
- No Comment

70% – 80% of product manager’s workload is communication. We talk to Sale team to understand the best way to sell our products, talk to martketing team to understand how we could approach our potential customers, talk to operational team to understand how the organization run, … and talk to engineer team about how things works. All these communications require understanding, accepting, empathizing and structuring comprehensive story. User Story Mapping helps you put every communication onto a map, so our team won’t get lost. This article will cite most content from book User Story Mapping of Jeff Patton.
Key Takeaways
Think — Write — Explain — Place
Why you need User Story Mapping?
Working on a map helps you easily identify your own mistaken or missing pieces when you put your though to a narrative timeline. Therefore, user story mapping would help you to see the big picture from beginning to the end. From that point of understanding, you will start to fill the detail of each step.
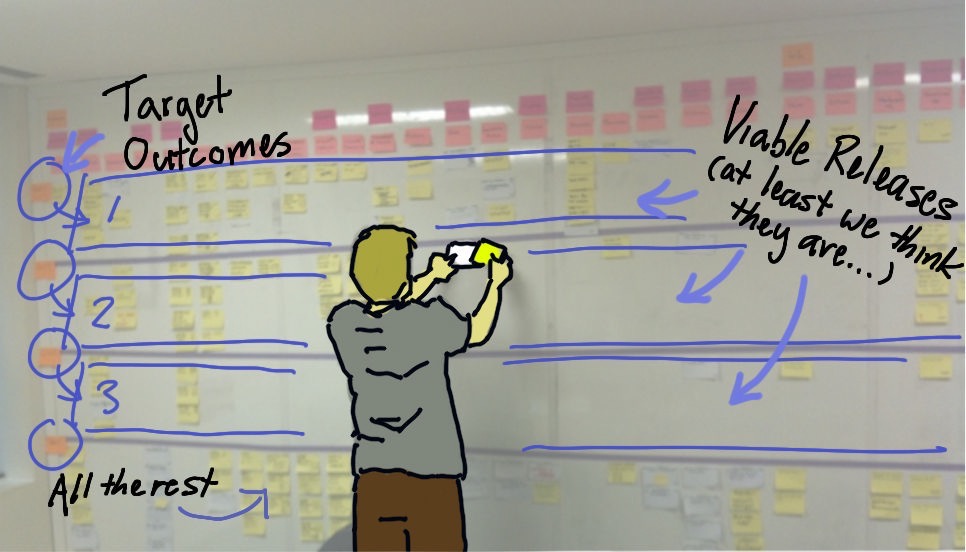
How does it look like?

The Narrative Flow is backbone of the story that you are going to build. On one hand, the story will be told follow the narrative flow from left to right direction. While from top down direction is each step detail breakdown. In that narrative flow:
- User types are key characters in the entire big story, they will be the center, and their stories will be told in substories (blue card under it).
- Blue cards are substories in that backbone (or epics if you are agile guys).
- Green cards are activities (or steps) inside substories.
- Yellow cards: under each steps we will have detail of what we could build, such as upload image, add free text, …
Mapping user story
Step 1: Frame the idea
To begin with, start with the WHY, why you are building this (this should be in the Product Discovery phase). It should be initiated by business objective that your team expect to see as the outcome of your work. The outcome could be revenue increase, or help users achieve a specific group of activities using your product.
By the clearly defining the expect outcome, as a product manager, you will know what should be put to the top of your product priority stack.
Step 2: Describe your customers and users
Next step is to identify your users. But, there are a lot of user types on your product, but please remember that you have no responsibility to help all of them, only the one that could help you achieve your target outcome.
Listing down types of users and how they can benefit from your product. For each user types, what kind of activities they would use our product for. Writing down these activities on Blue card and put them on the narrative flow. Next, we are going to go into detail of each activity.
Step 3: Tell your user story
Because it’s easy to get lost in the details, especially the ones you’re passionate about. When we’re trying to get the big picture, it’s important to get to the end of the story before catching all those details.
Each activity includes steps to achieve it. We will write down each step on green cards, place them under each activity where they belong to. Then next, we sort the green cards from left to right based on the order of user action. For example: (1) go to supermarket, (2) buy 2 bottle of beers, (3) go back home, (4) Put them into the fridge. It happens by sequence of steps.
Step 4: Explore Details and Options
Now we are going to fill the detail of each steps, remember to put important thing on top. We will write down the tasks on yellow cards and put it under each associate green card. These questions would help you to build up tasks:
- The specific things they’d do here?
- The alternative things they could do?
- What would make it really cool?
- And what if about when things go wrong?
Example from User Story Mapping by Jeff Patton. the product is for producer who manage music bands
Steps (green cards): Inside that activity (blue card): “Publicizing a show” was a big thing. It broke down into these steps arranged left to right underneath the “Publicizing the show” card:
- Start a show promotion.
- Review the promo flyer Mimi created for me.
- Customize the promo flyer.
- Preview the promo flyer I created.
- Detail: “Detail of the step above”
So, if you look inside a story step like “Customize the promo flyer,” you’d see details like:
- Upload an image
- Attach an audio file
- Embed a video
- Add free text
- Change the layout
Steps 5: Place the objective
Last but not least, because we build product or feature with purpose, it is useful to put the objective in the user story. By that way you won’t get lost from the main target. There are more things to do than your engineer team can do. So in the jungle of yellow cards let’s pick out the cards which help you to achieve your target objective. These cards will be put to the next development sprint after discussing with your engineer team.
When do we apply User Story Mapping?
When we try to put this in use? Actually, we could use User Story Mapping where we are going to tell story of our product. We will use it as reference to build up the prototype in Product discovery phase, or use it to communicate with tech team to help them understand what they are going to build. On other hand, you can use the story as reference whenever you feel stuck with what to do or to explain something to your stakeholders.
Importantly, when working on user story, you should loop your higher managers in. Why? it would help to involve them into the story, feel it and you are all in the same page.
Reference
Patton, J., & Economy, P. (2014). User Story Mapping: Discover the Whole Story, Build the Right Product (1st ed.). CA, United States: O’Reilly Media.